 04-22-2004, 05:35 PM
|
#1 (permalink) |
|
Psycho
Location: Sarasota
|
Let's build an aquarium
Before I was the bodypainter, I built aquariums (lots of them) into old Macs, monitors, and various bits of furniture. A combination of burnout and the new hobby with the airbrush has kept me from creating anything new for the last several years however. Having recently regained access to my workbench in the garage, I've been messing around with acrylic again and am rebuilding one of my first and favorite aquariums, which had become oldweakandpathetic in the extreme.
Sadly, I haven't taken pictures of the entire process but I hope someone will find what I'm doing interesting and if you ever want to work with acrylic (Plexiglas), I can probably help. I built this aquarium back in 1996. It's built into an oak end table I bought at a flea market. Holds about 13 gallons and is a nice little tank. 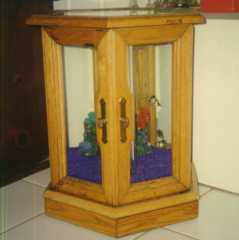 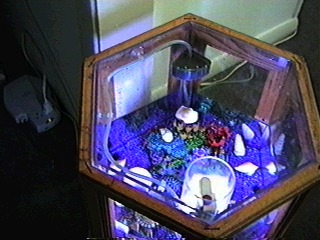 The problem is after moving from state to state, house to house, it got kind of weak and trashed. This week I am rebuilding it. As much as I like painting naked women, this is my real art. This is what lasts. I started with a 4 x 8 sheet of acrylic and ripped out the bottom and side piece. I had previously bought the chunk of 4" acrylic tube pictured here. <a href="http://www.techquarium.com/hextank/pictures/p4181560cs.jpg"target="_blank"><img src="http://www.techquarium.com/hextank/thumbs/th_p4181560cs.jpg" border="0"></a> When we're done it'll all fit together with the table pieces. All shown here. <a href="http://www.techquarium.com/hextank/pictures/p4181559cs.jpg"target="_blank"><img src="http://www.techquarium.com/hextank/thumbs/th_p4181559cs.jpg"border="0"></a> We have to bend the long piece 5 times to make a hexagonal tank. To do this, we'll clamp the piece to the desk and use a propane torch to heat the acrylic until it will bend. Once soft, we have enough time to take the piece off and line it up with the base of the aquarium (already cut) to get the angle just right. After it cools a bit, we clamp, heat, and bend again. <a href="http://www.techquarium.com/hextank/pictures/p4181561cs.jpg"target="_blank"><img src="http://www.techquarium.com/hextank/thumbs/th_p4181561cs.jpg" border="0"></a> <a href="http://www.techquarium.com/hextank/pictures/p4181562cs.jpg"target="_blank"><img src="http://www.techquarium.com/hextank/thumbs/th_p4181562cs.jpg" border="0"></a> <a href="http://www.techquarium.com/hextank/pictures/p4181565cs.jpg"target="_blank"><img src="http://www.techquarium.com/hextank/thumbs/th_p4181565cs.jpg" border="0"></a> Bending acrylic is really easy so long as you don't get in a hurry. You want to soften the material, not melt it and it's important to heat evenly across the width of the bend. <a href="http://www.techquarium.com/hextank/pictures/p4181566cs.jpg"target="_blank"><img src="http://www.techquarium.com/hextank/thumbs/th_p4181566cs.jpg" border="0"></a> <a href="http://www.techquarium.com/hextank/pictures/p4181569cs.jpg"target="_blank"><img src="http://www.techquarium.com/hextank/thumbs/th_p4181569cs.jpg" border="0"></a> <a href="http://www.techquarium.com/hextank/pictures/p4181571cs.jpg"target="_blank"><img src="http://www.techquarium.com/hextank/thumbs/th_p4181571cs.jpg" border="0"></a> And so it goes until we have 5 bends and 2 ends ready to trim and bond into the 6th corner of the hex tank. <a href="http://www.techquarium.com/hextank/pictures/p4181572cs.jpg"target="_blank"><img src="http://www.techquarium.com/hextank/thumbs/th_p4181572cs.jpg" border="0"></a> <a href="http://www.techquarium.com/hextank/pictures/p4181574cs.jpg"target="_blank"><img src="http://www.techquarium.com/hextank/thumbs/th_p4181574cs.jpg" border="0"></a> <a href="http://www.techquarium.com/hextank/pictures/p4181575cs.jpg"target="_blank"><img src="http://www.techquarium.com/hextank/thumbs/th_p4181575cs.jpg" border="0"></a> That's enough for now - it'll be home to a fish by the end of the weekend. To be continued. |

|
|
04-22-2004, 08:10 PM
|
#4 (permalink) |
|
Cosmically Curious
Location: Chicago, IL
|
Wow, thats awesome! I would love to make an aquarium out of old furniture, it looks beautiful, and so unique!

__________________
"The world is so exquisite with so much love and moral depth, that there is no reason to deceive ourselves with pretty stories for which theres little good evidence. Far better it seems to me, in our vulnerability, is to look death in the eye and to be grateful every day for the brief but magnificent opportunity that life provides" -Carl Sagan |
|
|
|
04-23-2004, 01:57 AM
|
#6 (permalink) |
|
Femme Fatale
Location: Elysium
|
I wouldn't know how to built a unique aquarium like that so eerhhh...could I buy yours instead?

__________________
I have all the characteristics of a human being: blood, flesh, skin, hair; but not a single, clear, identifiable emotion, except for greed and disgust. Something horrible is happening inside of me and I don't know why. My nightly bloodlust has overflown into my days. I feel lethal, on the verge of frenzy. I think my mask of sanity is about to slip. |
|
|
|
04-23-2004, 02:08 AM
|
#7 (permalink) |
|
Psycho
Location: Sarasota
|
Part 2
When I left off, I had just finished the last bend. Now it's time to trim off the extra and finish the edges so that it can be glued together.
I clamp the tank to the bottom so that I can mark where I need to cut. I'll mark at the bottom and then use a square to draw the line. Since the protective paper is removed, I put a piece of masking tape on both sides to cut through (to protect the acrylic from scratching and chipping). I set my jigsaw to a 30 degree angle and cut carefully -- really really carefully -- to the other side. Once done, I set it on the base again and test the fit. <a href="http://www.techquarium.com/hextank/pictures/p4181576cs.jpg"target="_blank"><img src="http://www.techquarium.com/hextank/thumbs/th_p4181576cs.jpg" border="0"></a><a href="http://www.techquarium.com/hextank/pictures/p4181578cs.jpg"target="_blank"><img src="http://www.techquarium.com/hextank/thumbs/th_p4181578cs.jpg" border="0"></a><a href="http://www.techquarium.com/hextank/pictures/p4181580cs.jpg"target="_blank"><img src="http://www.techquarium.com/hextank/thumbs/th_p4181580cs.jpg" border="0"></a> Now that the cut is made I have to make the other end of this seam angled as well. I'll do this by and with a file. It's slow going but it's safe and lets me get it just right. I also use the file to smooth the cut I just made on the other end. Once that's done I tape the thing together securely and apply thickened acrylic solvent to the inside of the seam. <a href="http://www.techquarium.com/hextank/pictures/p4201581cs.jpg"target="_blank"><img src="http://www.techquarium.com/hextank/thumbs/th_p4201581cs.jpg" border="0"></a><a href="http://www.techquarium.com/hextank/pictures/p4201583cs.jpg"target="_blank"><img src="http://www.techquarium.com/hextank/thumbs/th_p4201583cs.jpg" border="0"></a> Once the glue has dried, I put the acrylic tube through the hole in the base and glued it in. Then I glued the tank to the base and that's where I'm at as of today. <a href="http://www.techquarium.com/hextank/pictures/p4221585cs.jpg"target="_blank"><img src="http://www.techquarium.com/hextank/thumbs/th_p4221585cs.jpg" border="0"></a> After work today I will fill it with water and see if I've got an aquarium or if I have a leaking mess (it's not going to leak!). I have some more work to do on the wood parts which had got ugly over the years. Currently it is mostly sanded down and I'll be finishing it tomorrow. Sorry that I don't have more pictures of some of the stages of this build. Next time I do a project I would love to document it fully and make a set of web pages as a tutorial. In the meantime this weekend I will try to take pictures of the tools and glues I used for this project so you'll have some idea what you need to work acrylic. End part 2. |
|
|
|
04-26-2004, 01:55 AM
|
#9 (permalink) |
|
Psycho
Location: Sarasota
|
All done!
I finished it up this weekend and it's looking good!
First, I completed the refinishing of the wood. This was a simple sanding and rubbing with tung oil and looks very nice. Then I first filled the tank with water for a day and let it sit and then put the tank in the table and filled it again for a test. <a href="http://www.techquarium.com/hextank/pictures/p4241590s.jpg"target="_blank"><img src="http://www.techquarium.com/hextank/thumbs/th_p4241590s.jpg" border="0"></a><a href="http://www.techquarium.com/hextank/pictures/p4241587cs.jpg"target="_blank"><img src="http://www.techquarium.com/hextank/thumbs/th_p4241587cs.jpg" border="0"></a><a href="http://www.techquarium.com/hextank/pictures/p4251592cs.jpg"target="_blank"><img src="http://www.techquarium.com/hextank/thumbs/th_p4251592cs.jpg" border="0"></a> Next, I take care of the light. That's what the tube running down through the tank is for. I use a 12 watt florescent fixture with an aquarium spectrum bulb. I made an acrylic leg to hold it up to the mid-point of the tank and just drop it down inside and fish the cord out through the base. <a href="http://www.techquarium.com/hextank/pictures/p4251597cs.jpg"target="_blank"><img src="http://www.techquarium.com/hextank/thumbs/th_p4251597cs.jpg" border="0"></a><a href="http://www.techquarium.com/hextank/pictures/p4251599cs.jpg"target="_blank"><img src="http://www.techquarium.com/hextank/thumbs/th_p4251599cs.jpg" border="0"></a> And we're done! Here it is sitting in our living room with everything running. I put some plants and a couple snails in but haven't bought fish yet. Hope everyone likes it. <a href="http://www.techquarium.com/hextank/pictures/p4251604cs.jpg"target="_blank"><img src="http://www.techquarium.com/hextank/thumbs/th_p4251604cs.jpg" border="0"></a><a href="http://www.techquarium.com/hextank/pictures/p4251605cs.jpg"target="_blank"><img src="http://www.techquarium.com/hextank/thumbs/th_p4251605cs.jpg" border="0"></a> PS - Warwagon - I don't remember exactly what the blade is called. I use blades with fairly big teeth but as close to completely flat (no offset between teeth) as possible and run the jigsaw very slowly. |
|
|
|
04-26-2004, 07:37 AM
|
#10 (permalink) |
|
Psycho
Location: Under my roof
|
Kick ass! I really appreciate the work and the post. I've always wanted to make a fish tank out of an old monitor casing. I went so far as to gut the monitor and take out the tube, but that's about as far as I got. =/ the monitor casing has been travelling with me from location to location for the past 3 or 4 years and my wife finally said, "are you EVER going to make this into a fishtank? why don't we just throw it away?" . I acquiesced and we tossed it out just a couple weeks ago. LOL. Now, you've got me wanting to to make something like this again!!!
Love the end table though. Very cool idea. How do you fill/replace the water and clean it? Does the center piece in the top of the table come out for this?
__________________
I think that's what they mean by "nickels a day can feed a child." I thought, "How could food be so cheap over there?" It's not, they just eat nickels. - (supposedly) Peter Nguyen, internet hero |
|
|
|
04-26-2004, 01:59 PM
|
#11 (permalink) | |
|
Psycho
Location: Sarasota
|
Quote:
The whole top of this aquarium lifts off for access. I made the tank stick up about 1/3" above the top of the cabinet and then cut a groove in the underside of the lid so it is held in place. Here are much better versions of the pictures if anyone wants to see. http://www.techquarium.com/gallery/hextank |
|
|
|
|
05-20-2005, 02:10 PM
|
#15 (permalink) |
|
Upright
|
I've looked into doing a tank for my hermit crabs. From calling around, it's going to cost anywhere from 800 to 1200 for the acrylic and the stand. As the sheets would have to be sent from Calgary. Then I'd have to do it at my father-in-laws garage, as the condo doesn't have the room. Sheesh, listen to me whine. Oh well, once I quit smoking, I'll start doing one up. That should take me a year or so.
Here's my plan so far. 1/2 " or 3/4" cold cast acrylic sheets 4" x 8", I'll possibly need 2 of them. 40" width, 40" length, and 30" tall. With a lid that I can easily remove... planning to have that go over the top, and about 3 inches down the sides. Sort of like a cookie tin. I'm thinking maybe taller so I can build second level/balconies on the sides of the tank. It won't have to hold water as it's more of a terrarium, and the most that it needs to hold will be is sand for the bottom. If I do want to use it for an aquarium later, it'll need bracing down the middle, and I will have to use the 3/4" acrylic. I will have to get a custom bracing system done for it, as I need at least a 1/4" away from the stand for the undertank heater. Any obvious flaws in my plan so far? |
|
|
|
05-20-2005, 05:10 PM
|
#16 (permalink) |
|
Crazy
Location: Toronto, ON
|
If you're going to fill it later on with water and thinking of making it taller, I'd use 1" cast acrylic based on those dimensions. As a fish-head myself, I've seen too many monster acrylic aquariums using acrylic that's a little thin for my personal comfort. Then again I'm all about covering my a$$ when it comes to stuff like that.
|
|
|
|
05-20-2005, 05:20 PM
|
#17 (permalink) |
|
Upright
|
1 inch? Wow. That's going to cost... err.... yeah, here's the best price I got so far.
4 x 8 x 1/2"= $365.25 ea. 4 x 8 x 3/4" = $552.38 ea. No word on shipping and handling though. ") I think I'll start looking around freecycle for some larger aquariums at this rate. |
|
|
| Tags |
| aquarium, build |
|
|


